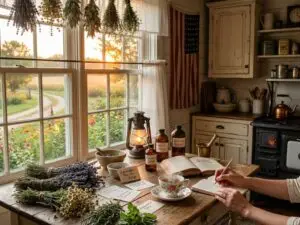


You really like living on the edge, huh? Now that Christmas is just a few days away, you’re definitely pressed for time to find the perfect gifts for friends and family. Going shopping is probably a no-go, especially since malls will be super crowded by this time. Your next best option is to make your own gifts. Try some easy homemade holiday presents that you can start making now and finish in time for your Christmas celebration.
[lookbook id=”80108″]
Homemade Ornaments
One of the easiest homemade holiday presents you can do now is DIY ornaments. You may think isn’t it too late to be giving out Christmas decorations but homemade ornaments don’t necessarily have to be Christmas-themed. They can be any type of ornament like snowflakes, stars, and heart-shaped ones. Plus, they can always reuse your handmade Christmas gift every year. You’ll find plenty of DIY Christmas ornament ideas online. Here are a couple of them:
Etched Snowflake Ornaments
Rustic ornaments will definitely look good on your Christmas tree or garland. Rustic will never go out of style and the fact that these decors are handmade by you makes them extra special. Your friends and relatives will surely appreciate receiving etched snowflake ornaments this holiday season.

What you need:
- Saw
- Birch branch
- Sandpaper
- Pencil
- Etching tool
- Drill and drill bit
- Ribbon or twine
What to do:
1. Find a piece of branch with a diameter ranging from 2 to 4 inches. Saw the branch into slices about half an inch thick. This will be a lot easier if you use a table saw or circular saw. A hand saw will also do the job, though.
2. Wipe away the sawdust and if you wish, smoothen the surface further with sandpaper.
3. Draw different snowflake designs on both sides of the birch slice. You can also personalize the ornament by writing the recipient’s name or initials.
4. Use your etching tool like the Dremel rotary tool to carve your design on the wood.
5. Drill a hole on one side of the wood slice using a small bit.
6. Slide the ribbon or twine through the hole and tie the ends together.

Homemade Clay & Salt Dough Christmas Ornaments
A homemade holiday present you can make with your kids? You’re hitting two birds with one stone here. First, you get to spend some fun quality time with the children. Second, you get to gift someone a DIY Christmas present that’s affordable and easy to make.
These homemade clay and salt dough ornaments only require a few ingredients, and the instructions are simple enough that kids can definitely help out. And by making it with your own hands, such Christmas presents hold a deeper meaning that the recipient will surely appreciate.

What you need:
- 1 cup of flour
- 1/2 cup of salt
- 1/2 cup of water
- Food coloring (optional)
- Cookie cutters
- Skewer or lollipop stick
- Watercolor paint
- Watercolor brush or brush pen
- Ribbon or twine
What to do:
1. Combine the flour, salt, and water in a bowl and mix until the dough is smooth. If you want to add food coloring, do so at this point.
2. Roll out the dough and cut out ornaments using cookie cutters. If you’re in a pinch, you can also use cardboard to cut shapes and freehand it with a knife.
3. Poke a hole in the upper part of each shape. Use a skewer, lollipop stick, or something similar.
4. Place the dough on a cooking sheet and bake in an oven for 15 minutes at 350 degrees Fahrenheit.
5. Once the homemade Christmas presents cool down, use watercolor paint to make each design. You can either use a brush or a brush pen for this.
6. Let the paint dry and then tie a ribbon or piece of twine around the ornament to finish it off.
[lookbook id=”80113″]
DIY Foaming Clay Soap
Homemade soap is a great gift to give to people of all ages. Even if they already have their favorite soaps that they use, homemade soap will always seem more special. You can even make it more personal by writing their initials on the bar. Here are some homemade soap recipes to get you started.
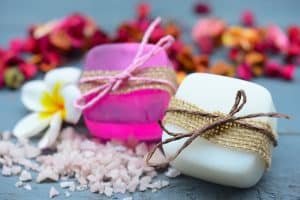
Aside from the design, you can also customize the ingredients. If the person you’re giving the soap to has sensitive skin, for example, you can use ingredients that are suited for them.
The DIY foaming clay soap is perfect for people with acne problems. It cleanses the skin thoroughly while minimizing oil. It has a homemade clay base and homemade clay is great for acne-prone skin since it helps draw out impurities without drying out the skin. Here’s how to make this homemade Christmas present:

What you need:
- 2 lbs. melt-and-pour soap base
- 2 oz. bentonite clay
- silicone mold
What to do:
1. Cut the melt-and-pour soap base into small pieces then place them in a microwave-safe bowl. Heat the soap chunks for 30 seconds at a time. Do so until the soap has completely melted.
2. Add the bentonite clay to the melted soap base. Stir until the clay and soap are completely mixed.
3. Pour the soap mixture into the silicone mold and allow the soap to cool and harden. Pop the hardened soap out of the mold and it’s done!
Handmade Bath Bombs
Everyone deserves a nice warm bath after a long tiring day. Laying down on the bathroom floor and letting the shower run may be a little too dramatic. What you need is to fill out your tub with warm water, add a homemade bath bomb, and relax. These homemade holiday presents are quite easy to make if you have the know-how.

What you need:
- 1 cup baking soda
- 1/2 cup cornstarch
- 1/2 cup citric acid
- Essential oil of your choice
- Food coloring
- Water
- Mixing bowl
- Measuring spoons
- Spoon
- Bath bomb molds
What to do:
1. In a large mixing bowl, combine the baking soda and cornstarch. Break up any clumps with a mixing spoon.
2. Add a few drops of essential oil at a time to the dry mixture and stir until well-mixed. Use a spoon or your hands to fully combine the oil with the powder mixture. You can wear a clean pair of disposable gloves if you prefer not to use your bare hands.
3. Add food coloring a few drops at a time and mix with your hands. The color will become deeper and more intense as you add more drops.
4. Stir half a teaspoon of water at a time into the mixture. Continue adding water until the mixture has the consistency of damp sand. You should be able to form a tight clump.
5. Mix in the citric acid until it’s properly incorporated.
6. Pack the mixture into your bath bomb molds. Compact it as much as possible so that the bombs are firm. Fill it to the brim and slightly overfill it. Press the two sides of the mold together then pull one side off gently. Flip the ball into your hand, then pull the other side of the mold off.
7. Let the bombs rest and dry for a few hours. Once they’re completely dry, they’re ready to use!
[lookbook id=”80115″]
Handmade Candles
Candles make perfect homemade holiday presents because they come in all shapes and sizes, and can be customized to fit the personality of the recipient. They’re also really easy to make. All you need is a few supplies and about an hour of your time. Homemade candles are definitely perfect as last-minute Christmas presents.

What you need:
- Wax (paraffin, soy, gel, or beeswax)
- Fragrance oils
- Liquid dyes
- Pre-waxed wicks or wood wicks
- Thermometer
- Wooden stirring stick
- Pour pot or double boiler
- Saucepan
- Heat-proof container
What to do:
1. Chip off pieces of wax from the block using a hammer and chisel. Fill the pour pot with the wax chips.
2. Fill 1/3 of the saucepan with water. Place the pot on the pan then bring the water to a rolling boil.
3. With a wooden stick, continuously stir the wax until it completely melts.
4. Once the wax has melted, check the temperature with the thermometer. It should be somewhere between 110 and 140 degrees Fahrenheit, which is the ideal pour temperature.
5. Pour 1/2 ounce of fragrance oil and 1/2 ounce of liquid dye into the wax once it reaches the right pour temperature. Stir to mix thoroughly.
6. Pour the wax into your heat-safe container. Make sure it’s clean and dry.
7. Insert a tabbed wick into the center of the candle immediately after pouring.

Homemade Dog Shampoo
For dog lovers, receiving gifts meant for their furry friends is enough to brighten up their holiday mood. Aside from dog food and toys, they’ll surely love dog shampoos. Who doesn’t like a nice-smelling mutt, right?

Make your Christmas present extra special by doing it with your own hands. There are plenty of dog shampoo recipes out there to choose from. Here’s one of them:

What you need:
- 1 cup warm water
- 1 cup organic apple cider vinegar
- 1 cup light-scented natural dishwashing soap
- 2 oz glycerine
- 1 empty Mason jar or any container with a lid
What to do:
1. Pour the dishwashing soap into your empty container first followed by the other ingredients. Screw on the top and shake well to combine thoroughly.
2. Store the homemade shampoo in a cool, dry place and use it within two weeks. That’s it! Just tell your dog lover friend to wait until your homemade holiday present is ready before using it on their pet.
You’ll never run out of ideas for homemade holiday presents. Aside from what we’ve listed down here, you can also gift your friends and family with a cake, cookies, or other baked goodies. Preserved food like tomato sauce and fruit jams are also popular. How about an embroidered pillow, a knitted scarf, or even an ugly Christmas sweater? Well, you probably won’t finish the last ones in time for Christmas but you should definitely consider making them for the next holiday season. Discover more DIY ideas over at Gentleman Pirate Club.