

Many people can’t afford to take prepping seriously even if they want to. With how low the minimum wage is ($7.25 per hour as of this writing) and how high the prices of basic commodities are right now, it’s quite challenging to purchase what you need to fill up your prepper pantry. The good news is that it’s possible to build your emergency food supply on minimum wage. It may take a little more time and effort (and some smart shopping), but anyone can do it. Here are a few tips for getting started:
[lookbook id=”87635″]
1. Plan and budget
Before you start building your emergency food supply, it’s important to get a better grasp of your spending power. First, create a list of all your expenses and deduct these figures from how much you’re earning. Assuming you have one minimum wage job and work 40 hours per week, that should give you roughly $1,250 a month or $15,080 a year. Here are some suggestions on how you can plan and budget properly:
Determine your fixed expenses
Set aside the amount for fixed expenses such as rent or mortgage, utilities, school fees, child care costs, car payments, other loan payments, insurance, and property taxes. Set aside a budget for food, savings, and other basic expenses, as well. Make sure you’re seated so you won’t hurt yourself if you faint after seeing how much is left. Seriously, though, make sure you’re realistic about what you can and cannot spend.
Prioritize paying off your debts
You can’t skip a loan payment just because you want to start building your prepper pantry. A huge part of prepping is paying off all debts as quickly as possible because it gives you more financial flexibility and security in the event of an emergency or disaster. Simply put, if you don’t have outstanding debts, you can use your savings and resources without stressing out about how you’re going to pay off your loans or possibly losing your home or other properties to creditors.
Determine your variable expenses
Variable expenses are those which vary from month to month. Examples include groceries, entertainment, medical costs, and emergency savings. Make sure you factor in these items into your budget so you won’t be caught off guard when they come up.
Set an amount for your emergency food supply and make adjustments if possible
The remaining amount after the fixed and variable expenses will be your base budget for emergency food supplies. Make sure you set an amount that is realistic and achievable based on your overall budget. If possible, try to adjust or reduce other items in your spending plan to allocate more money to emergency prepping. This should be an amount you can realistically afford without putting undue strain on your budget.
For example, you can reduce your food expenses by not eating out or having food delivered. These are more expensive than home-cooked meals. And instead of buying your ingredients at the grocery, you can purchase more affordable food from local farmers’ markets. You need to be creative in planning your budget if you want to save more and be better prepared for emergencies. Also, keep in mind that unexpected expenses may arise and you may need to adjust your budget accordingly.
2. Start with the basics
Focus on stocking your pantry with basic staples like rice, beans, pasta, and canned goods. These items are versatile and can be used in various ways and recipes. This is important since you can get bored or tired of eating the same thing.
Since you’re strapped for cash, you should refrain from buying anything fancy. While that expensive-looking box of cookies looks nice and all, it’s probably not within your budget. For now, purchase food items that make more sense. Go with cheaper products and those that will last longer. This is the best way to build your emergency food supply without breaking the bank.

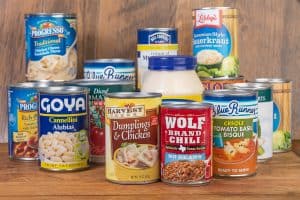
3. Prioritize non-perishable items
When shopping for your emergency food supply, prioritize non-perishable items such as canned goods, dried fruits and vegetables, and shelf-stable milk. Emergency food is meant to be consumed when it’s impossible to go out and buy food. In the event of a hurricane or flood, for example, you can’t go out to buy something to eat. If you don’t have ample food at home, you can starve before things go back to normal.
Your emergency food supply should be stored properly until it’s time for you to consume them. That’s why you should focus on non-perishable food items that have a longer shelf life. Those that need to be refrigerated or frozen will not last long if power is out so they’re not good choices for your prepper pantry.
4. Buy less expensive brands
The key to building an emergency food supply on minimum wage is to make sure you’re getting the most bang for your buck. One way to do that is to opt for generic brands instead of buying the expensive and more popular ones. Generic brands are usually cheaper and oftentimes, just as good as the more popular ones.
5. Don’t shop at big supermarkets
Big supermarkets tend to have more expensive items than smaller stores. If you want to save money and build your emergency food supply on minimum wage, avoid these supermarkets. Instead, shop at neighborhood corner stores, local farmers’ markets, and ethnic grocery stores where prices are usually lower. You can also find great deals online at Amazon Pantry, Frog & CO, and similar sites.
6. Take advantage of sales and discounts
When possible, take advantage of sales and discounts on emergency food supply items. This can help you stretch your budget further. Don’t forget to check out your local grocery store flyers and coupon sites. You may be able to get emergency food supply items at discounted prices. Don’t miss out on these opportunities, as they can help you save a lot of money on emergency prepping supplies.
[lookbook id=”87637″]
7. Buy in bulk
If you can afford to buy in bulk, do it! Buying emergency food in larger quantities will save you a lot of money in the long run as most grocery stores tend to offer discounts when buying food items in bulk.
It’s also a good idea to buy in bulk whenever possible since this is usually cheaper than buying smaller amounts. If you do the math, you’ll find that buying 24 cans in bulk can be cheaper than buying the same 24 cans one at a time.
MREs and other freeze-dried foods are better bought in bulk because they come in sealed containers that are easier to store in your pantry. If you buy them pouch by pouch, you’ll need to figure out how to properly store them. These pouches and even carton boxes can easily be damaged by rodents, fire, and floodwater.
But be careful when purchasing bulk items. Make sure that you get the ones with a long shelf life since there’s s good chance they’ll be staying in your pantry for quite a while. If you buy too many of the same product that doesn’t last that long, some of them may end up being wasted. Be sure to use all of them before their expiration date or rotate them regularly to avoid this.
Another tip for buying in bulk is splitting them with friends, family, or fellow preppers. This is a great way to stock up on emergency food supplies without spending too much or letting them go to waste.
8. Build your emergency food supply gradually
Contrary to what we just said, buying one food item at a time is also a good way to build your emergency food supply on minimum wage. If you can’t afford to buy in bulk since you have other expenses to think of, you can set aside a small amount to buy a few items each month.
For example, when you go on a grocery run for your everyday needs, you can pick up an extra can or two to add to your prepper pantry. If you do this each month, you’ll have 12 to 24 canned goods saved up for emergencies by the end of the year. It’s not much but it’s better than nothing, right?
9. Find alternative sources of emergency food
If you still can’t afford to buy emergency food products, there are other ways to stock up on supplies. One is to barter goods or services with other people. Exchange some of your pre-loved items, handcrafted products, or services for canned goods and emergency sustenance supplies. Of course, you can also sell these items and services and use the money for building your emergency food supply.

You can also look for free emergency food supplies from your local government, food banks, or a charitable organization. These groups often give away food for free or at discounted prices. Keep an eye out on the news and social media pages, as they often announce emergency food distribution events.
10. Make your own emergency food
First of all, you can grow and raise your own food at home or in a community garden. This helps lessen your grocery expenses and the money you save from not buying from stores can be set aside for building your emergency food supply.

Furthermore, the produce you harvest can be turned into emergency food. Tomatoes, for example, can be canned and stored over a long period of time. They can also be pickled, sundried, or turned into sauce, paste, or ketchup. The same can be done with other fruits and vegetables as well. With proper storage, you can keep these homemade products for months.
Fruits, vegetables, and herbs can be dehydrated and packed to extend their shelf life. Meat products can also be dehydrated and stored in your prepper pantry.

To make pork and beef jerky, for example, you just have to slice the meat thinly, marinate them, and dry them in a dehydrator. Then you can store them in airtight containers or vacuum-sealed bags. Dried foods can last up to a year without any problems.
You can also make emergency snacks like trail mix and granola bars. They don’t require any special equipment and are very easy to make. Plus, they’re tasty and nutritious so you can munch on them during emergency situations.

11. Store safely and properly
Keep your emergency food supply in a cool, dry place, like a basement or pantry. Avoid places that are exposed to direct sunlight and heat as this may cause the food to spoil quickly. You also want it to be flood-free and rodent-proof.
It’s also a good idea to place your emergency foods in sturdy, waterproof containers. You can get emergency food buckets, water barrels, and stackable buckets from emergency supply stores. This helps keep your emergency foods safe from pests and other elements that can cause them to spoil or go bad.

Properly storing your food can help it last longer, saving you money in the long run. If you don’t take the necessary measures to store them properly, your supply may end up going bad before you can use them. There’s also the issue of rodents, water leakage, and natural calamities that can damage your emergency food supply. When that happens, all your hard earned money and efforts will be for naught.
Check your pantry regularly. Look for possible signs of spoilage, leakage, and infestation. If you spot any issues, throw out the affected emergency food items immediately, and make sure to clean your pantry thoroughly before restocking it with new emergency food supplies. The sooner you fix any problem, the fewer chances of wasting your food supply.
12. Rotate your emergency food
Rotating your emergency food supply is also important to make sure they don’t get spoiled before you can use them. Employ the first-in-first-out rule so that you use the older food first and stock up with new ones. This will help ensure that your emergency food supply stays fresh, safe, and nutritious for the longest time possible.

Check the expiration dates of your emergency foods regularly. Place large, readable labels on each item if necessary so you won’t forget when to use them. That way you can monitor their shelf life and make sure nothing gets wasted. Doing this ensures that your emergency food supply is always ready and that you won’t be caught off guard in case of emergency situations.

Don’t forget to include potable water in your emergency food supply. Emergency foods will not do much if you don’t have enough drinking water. Ensure that you have an emergency water source on hand at all times.
Building an emergency food supply can be challenging on a low income so you have to be mindful of your financial situation. But with smart planning and budgeting along with the other tips mentioned above, it is possible. Discover more life-saving tips over at Gentleman Pirate Club.